
HL10 LIFTER - Helmet accessory PLANTRONICS - Free user manual and instructions
Find the device manual for free HL10 LIFTER PLANTRONICS in PDF.

| Product Type | Automatic handset lifter (headset accessory) |
| Brand | Plantronics |
| Model | HL10 Lifter |
| Main Function | Automatically lifts and lowers the telephone handset for hands-free calls via headset |
| Power Supply | Via power cord plugged into the accessory phone jack of a compatible Plantronics amplifier |
| Height Adjustment | 3-position switch (low, medium, high) |
| Mounting | Double-sided adhesive tape (two pieces) for attachment to the telephone |
| Compatibility | Plantronics amplifiers CA10, CS10, A20, S20 and related products |
| Dimensions (estimated) | Approximately 7.5 cm x 5 cm x 2.5 cm |
| Weight (estimated) | Approximately 50 g |
| Care and Cleaning | Unplug before cleaning; use a damp cloth without liquid or aerosol products |
| Safety | Do not disassemble; keep the lifting pad clear; do not use in wet environments; avoid overloading |
| Warranty | 1 year from date of purchase (USA and Canada) |
| Customer Service | Plantronics TAC: 831.458.7700 x5538 or www.plantronics.com |
Frequently Asked Questions - HL10 LIFTER PLANTRONICS
User questions about HL10 LIFTER PLANTRONICS
0 question about this device. Answer the ones you know or ask your own.
Ask a new question about this device
Download the instructions for your Helmet accessory in PDF format for free! Find your manual HL10 LIFTER - PLANTRONICS and take your electronic device back in hand. On this page are published all the documents necessary for the use of your device. HL10 LIFTER by PLANTRONICS.
USER MANUAL HL10 LIFTER PLANTRONICS
Quick Start User Guide
Guide d'Utilisation
pour la Mise en
Route Rapide
Guía Rapida
para el Nombre
Guia de Usuario
de Inicio Rápido
원 죽터 유자 기이드
クイクスたトム一咔ガイド
快速使用手册

HL10 HANDSET LIFTER ACCESSORY
IMPORTANT SAFETY INSTRUCTIONS
Read all instructions before using.
When using telephone equipment and accessories, basic safety precautions should be taken to reduce risk of fire, electric shock, and injury to persons including the following:
1 The intended purpose of this HL10 Handset Lifter is to lift and lower the telephone handset in conjunction with Plantronics amplifiers CA10, CS10, A20, S20, and other Plantronics products manufactured for use with the HL10 Handset Lifter. It should not be used for any other purpose.
2 To ensure safe operation, install, adjust and operate the HL10 Handset Lifter according to these instructions.
3 Keep fingers and other objects clear of the lifting pad.
4 To reduce the risk of electric shock do not disassemble this product; contact the Plantronics Technical Assistance Center when service or repair work is required. Opening or removing covers may expose you to dangerous voltages or other risks. Incorrect re-assembly can cause electric shock when the product is subsequently used. Modification of the product may void the warranty.
5 Disconnect the amplifier or power source from the mains supply before cleaning. Do not use liquid cleaners or aerosol cleaners. Use a damp (not wet) cloth for cleaning.
6 Do not allow anything other than the telephone handset to rest on this product or locate it in an area where normal operation can be hampered. Additional weight will prevent the lifter from working.
7 Do not expose this product to rain or excessive moisture.
8 Do not place this product on an unstable trolley, stand or table. The product may fall causing serious damage to the product.
Save these instructions
QUICK START GUIDE
The HL10 Handset Lifter accessory is designed to automatically lift most standard telephone handsets off the cradle when activated by your Plantronics amplifier.
Use the numbered illustrations in the centre of this guide. The centre section may be pulled out for easier reference and use.
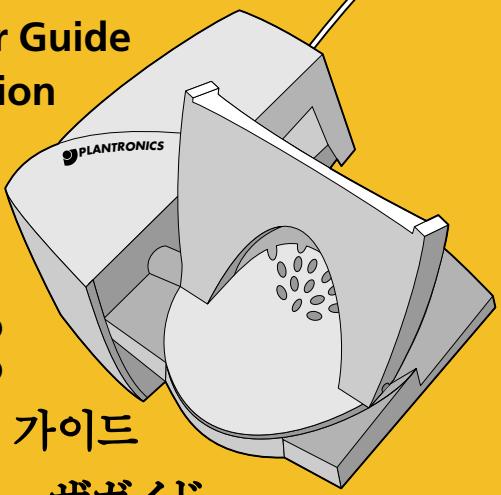
1. Identify Lifter Parts
See reference number 1 on illustration
(Top view of the lifter on a telephone)
1.1 Motor Housing
1.2 Lifting Pad
(Back and underside view of lifter alone)
1.3 Lifter Height Switch (low, medium, or high)
1.4 Accessory Jack
1.5 Mains Lead (non-removable)
2. Position and Test Lifter
See reference number 2 on illustration
Note: Do not remove the mounting tape backing until directed to do so.
2.1 Plug the mains lead into your Plantronics amplifier accessory jack and position the lifter under your telephone handset towards the earpiece. You may need to position the lifter slightly differently for optimal lifting.
Tip: Remove only a tiny piece of the mounting tape backing to temporarily stick the lifter into a test position.
2.2 Use the three-position lifter height switch to adjust the lifter to its optimum height. Test the lifter's position by
pressing the talk button on your amplifier, remote unit or headset. You should hear a dial tone in the headset if the telephone handset is raised high enough.
3. Mount Lifter
See reference number 3 on illustration
3.1 Mounting Tape
(Underside view of lifter)
Once you have determined the best position for the lifter, remove the mounting tape backing on the top or side to best adhere the lifter to your telephone. On a few telephones both the top and side mounting tapes must be used to firmly grip the telephone.
4. Make and Receive Calls
See reference number 4 on illustration
4.1 Put on your headset and press the talk button.
4.2 This action directs the lifter to raise the telephone handset from the cradle and activates the telephone line.
To make a call, use your telephone to dial the number.
When your call is completed, press the talk button again to hang up.
When receiving a call, the ring detector senses a ring from your telephone and transmits it to your remote unit or headset. You can answer the call by pressing the talk button and begin talking through your headset. When your call is completed, press the talk button again to hang up.
Note: For remote ring detection to work you may need to increase the telephone ringer volume. In some cases, telephones with multi-ring tone choices may require trying several tones to choose the most effective sound for ring detection.
TROUBLESHOOTING
I cannot hear a dial tone
Press the talk button or headset/handset bar as appropriate to activate your amplifier.
Set lifter height switch to a higher setting, if it's not opening the hook-switch.
I hear a ring on the telephone but not on the remote
- Check that the remote unit ringer switch is set to the "on" position.
Make sure the lifter mains lead is completely plugged into the amplifier or base.
Your phone's ringer volume may have to be turned up.
The lifter does not lift the handset
First check that the headset works by manually lifting the telephone handset from its cradle.
Reset the remote unit or headset into the charger for 20 seconds to re-establish synchronization.
Make sure the lifter mains lead is completely plugged into the amplifier or base.
Plantronics Technical Assistance Center
For assistance and accessibility information call the Plantronics Technical Assistance Center (TAC) 831.458.7700 x5538 Sunday 5 p.m. till Friday 5 p.m. Pacific Standard Time or visit the Customer Support section of our website at www.plantronics.com or contact your local distributor.
LIMITED WARRANTY
What does this warranty cover?
This warranty covers any defects in workmanship or materials in this product purchased in the U.S. or Canada. For warranty information in other countries, contact your local distributor.
How long does the coverage last?
This warranty runs for one year from the date of purchase.
What will Plantronics do?
If the product is found defective, we will either replace or exchange it at no charge.
What does this warranty NOT cover?
Damage caused by accident, abuse, misuse, or an act of God (such as a flood) are not covered. Implied guarantees, including those of merchantability, fitness for a particular purpose and non-infringement shall (a) have no duration greater than one year from the date of purchase, (b) terminate automatically at the end of that period, and (c) to the extent permitted by law, be excluded. Consequential and incidental damages, including without limitation, loss of property and those arising from breach of any express or implied warranty, are not the responsibility of Plantronics, and to the extent permitted by law, are excluded. Some states do not allow exclusion or limitation of incidental or consequential damages, so the above exclusion may not apply to you.
How do you get service?
To obtain service in the U.S. contact Plantronics at (800) 544-4660 and in Canada call (800) 540-8363.
How does state law apply?
This warranty gives you specific legal rights, and you may also have other rights, which vary from state to state.
DÉCROCHEUR
DE COMBINÉ
ACCESSOIRE HL10
CONSIGNES DE SECURITÉ IMPORTANTES
Centre d'Assistance Technique Plantronics
1. Identifique as partes do suspensor
World Leader in Communications Headsets
345 Encinal Street
Santa Cruz, California 95060
(800) 544-4660
www.plantronics.com
PaplendreTroNkSt (Plantronics) giul jwri n
m = 311
测深学回理 27
于
a4 = a1 + 3
27邮不入4-1 2八嘉子不入心
- Quick Start User Guide
- Guide d'Utilisation
- pour la Mise en
- Route Rapide
- Guía Rapida
- para el Nombre
- Guia de Usuario
- de Inicio Rápido
- 원 죽터 유자 기이드
- クイクスたトム一咔ガイド
- 快速使用手册
- HL10 HANDSET LIFTER ACCESSORY
- IMPORTANT SAFETY INSTRUCTIONS
- Save these instructions
- QUICK START GUIDE
- Identify Lifter Parts
- Position and Test Lifter
- Mount Lifter
- Mounting Tape
- Make and Receive Calls
- TROUBLESHOOTING
- I cannot hear a dial tone
- I hear a ring on the telephone but not on the remote
- The lifter does not lift the handset
- Plantronics Technical Assistance Center
- LIMITED WARRANTY
- What does this warranty cover?
- How long does the coverage last?
- What will Plantronics do?
- How do you get service?
- How does state law apply?
- DÉCROCHEUR
- DE COMBINÉ
- ACCESSOIRE HL10
- CONSIGNES DE SECURITÉ IMPORTANTES
- Centre d'Assistance Technique Plantronics
- Identifique as partes do suspensor
- World Leader in Communications Headsets
- PaplendreTroNkSt (Plantronics) giul jwri n
Brand : PLANTRONICS
Model : HL10 LIFTER
Category : Helmet accessory